Search
 Login / Register
 Store Finder
 010 023 7220
Not sure where to start?
Answer a few simple questions and we’ll direct you to your perfect bed.
Find your bed
Enable notifications to get the best news on sales and special offers

The Mattress Warehouse sells a variety of pre-made headboards. However, these might not be the exact style or fit you’re looking for. Therefore, if you’re looking for some way to customise a headboard that’ll suit your budget and unique bedroom style then read on!
At the Mattress Warehouse, we’re experts in the bedroom furniture business. After years of experience, we can tell you this: It’s not that hard to personalise your own pieces of (simple) furniture. As long as you have the right set of instructions and tools, it’ll be a walk in the park!
Having said that, we decided to provide you with step by step instructions to make your own DIY versions. Below you’ll find these steps to two types; wooden or tufted/upholstered. We hope that you’ll thoroughly enjoy making this DIY or find some inspiration to make something completely original!
A reclaimed wooden headboard is easily the most versatile way you can customise your bed. By doing it yourself, you get to decide how rustic and rugged or how modernly rounded off you want it to be in order to fit the look and feel of your bedroom.
For the DIY wooden version you’ll need:
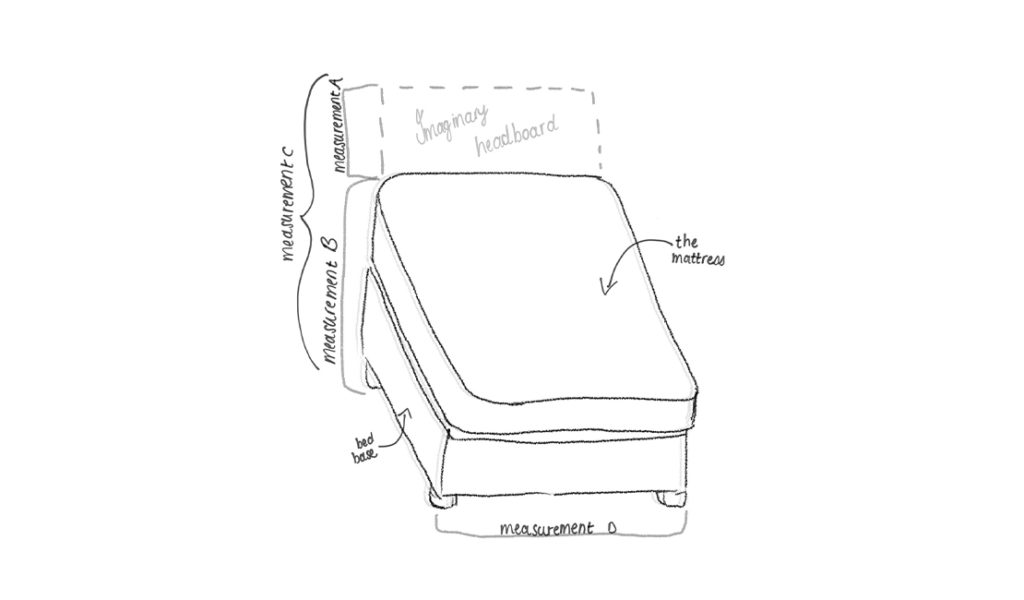
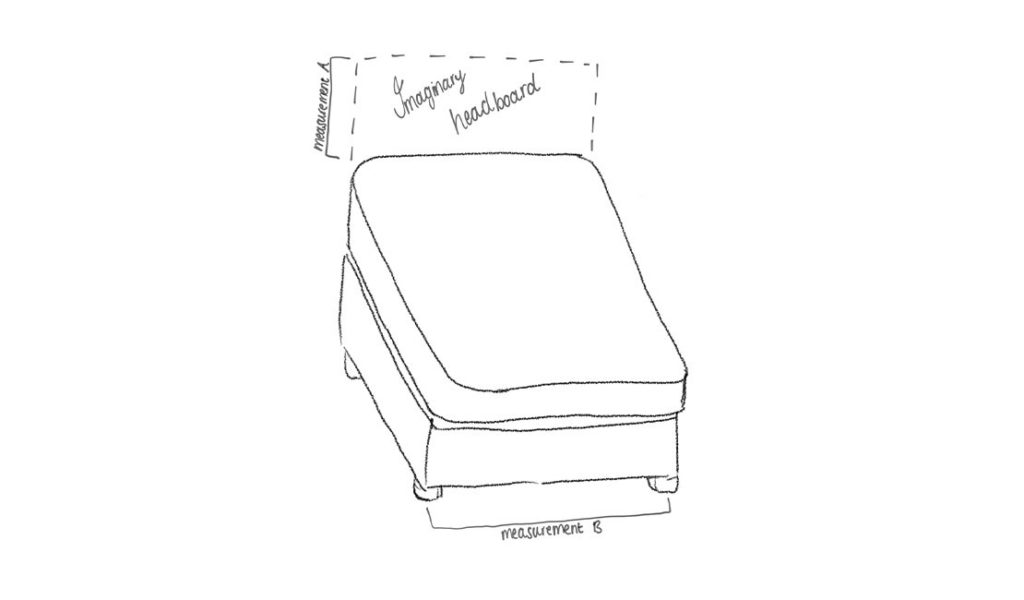
To know exactly how much wood you’ll need and how big to build your frame, it’s important to take perfect measurements of your bed. This will determine how high and wide your DIY headboard will be.
Now that you have all the measurements, you can start assembling your frame.
Pro tip: If you’re intimidated by sawing the boards yourself, ask your timber supplier/hardware store near you to cut the boards the exact lengths you want. This will make the process a lot less stressful and much more accurate if you’re a newbie!
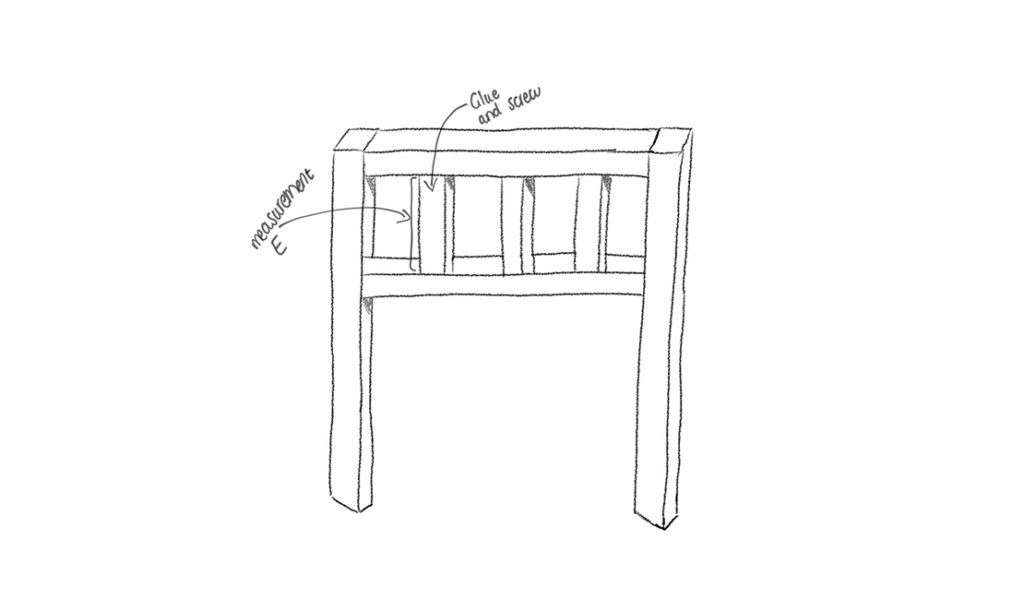
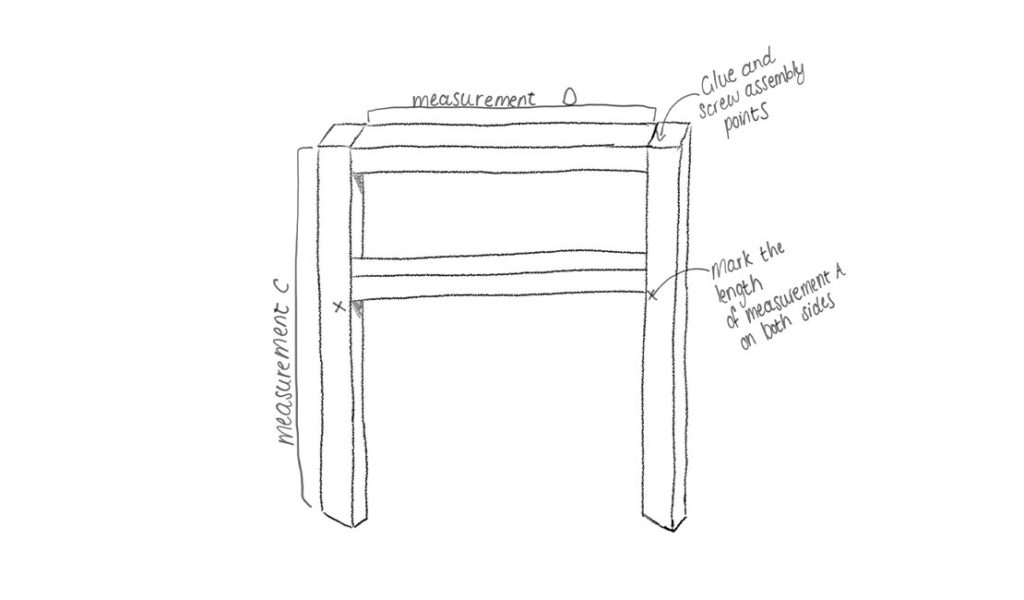
5. Next, measure the distance between the upper and lower “rungs” in the frame. This will be measurement E.
6. Cut three 44x44mm boards to the same length as measurement E.
7. Glue and screw these three boards vertically between the two rungs of the frame (evenly distributed).
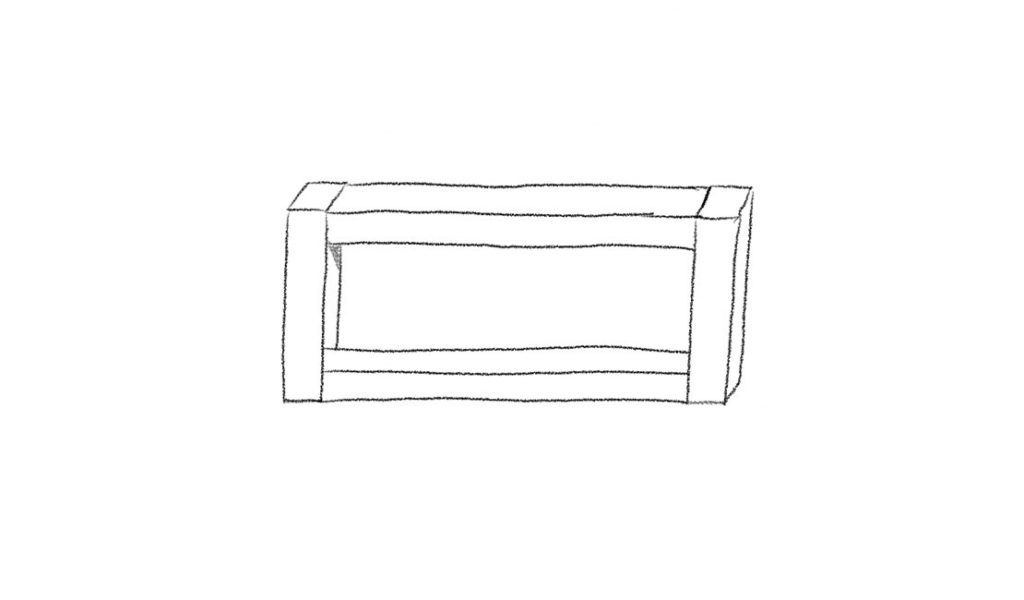
8. By now, your frame should look like this:
9. Lastly, measure the final width of your frame and cut one 32x67mm board (or skirting) to that exact measurement. This board will be used in the final phase of rounding off your project, so you can put it to the side for now.
Now that you have your frame set up, it’s time to start the fun part! Now you can strip the pallets, saw the pieces into smaller boards, and decorate your frame with pallet “tiles”. Make sure to wear gloves when you’re working with raw wood to protect your hands from splinters and sharp nails.
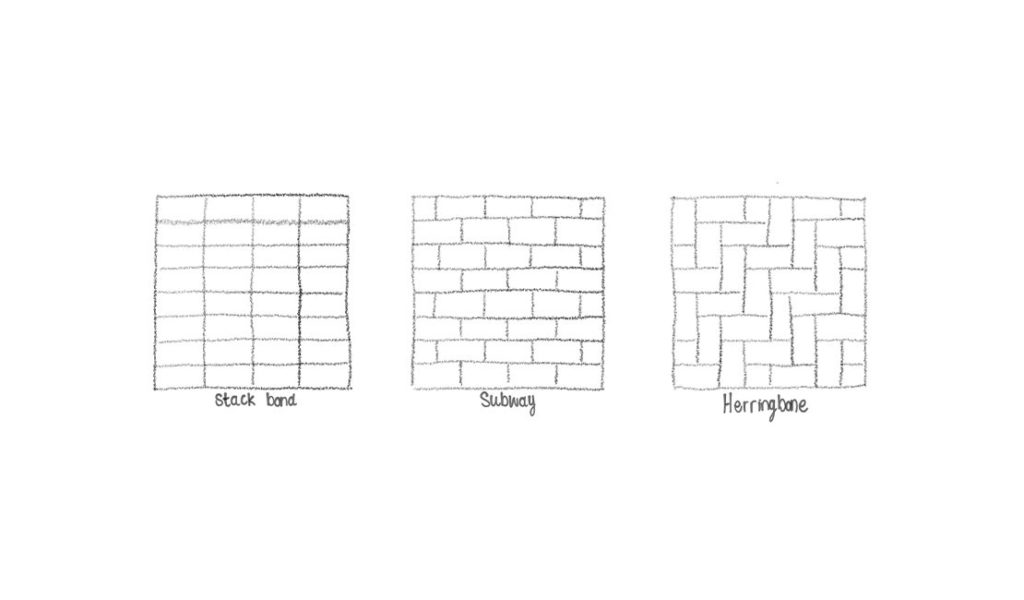
Some style ideas include stack bond, subway, herringbone or basketweave. Choosing a simple style like subway will make the process much easier, especially if this is your first timber project!
This is also the step where you can mix and match with darker pallet wood if you’re not painting the boards.
3. Now that you’ve laid out your pallet boards, mark where you’ll have to cut off excess to make the pattern fit perfectly onto the frame.
4. Cut your boards according to the markings with a Miter saw or handsaw.
5. Sand all the boards’ sides and edges until smooth (remember, you’ll be sleeping near these boards. The last thing you want is to wake up in the middle of the night with a splinter between your fingers!).
6. If you’re going to paint the board’s different colours, now is the time to do so. However, if you’re finishing with one stain/paint colour, you can just leave it till the end.
7. Next, secure all the pallet boards onto the frame the way you laid them out previously with nails and some wood glue for extra durability.
8. Lastly, lay the 32x67mm board flat on top of the frame, and secure it with nails onto the frame.
Now that you have the whole thing assembled, it’s time to finish it off your DIY project by adding the final touches. If you already did some painting (step 6 of the previous section), you’ll just be sealing and finishing the frame.

There you have it! You very own DIY wooden headboard. Now you can happily rest on your bed every night knowing that you made (part of it) with your own hands!
An upholstered headboard is a great addition to your bedroom since it satisfies both comfort and style. Also, if you’re looking for somewhat of a more classical bedroom style this DIY is the perfect option for you!
For an upholstered version, you’ll need:
To know exactly how much wood you’ll need and how big to build your frame, it’s important to take perfect measurements of your bed. This will determine how high and wide it will be.
So to recap:
Pro tip: If you’re intimidated by sawing the boards yourself, ask your timber supplier/hardware store near you to cut the boards the exact lengths you want. This will make the process a lot less stressful and much more accurate if you’re a newbie!
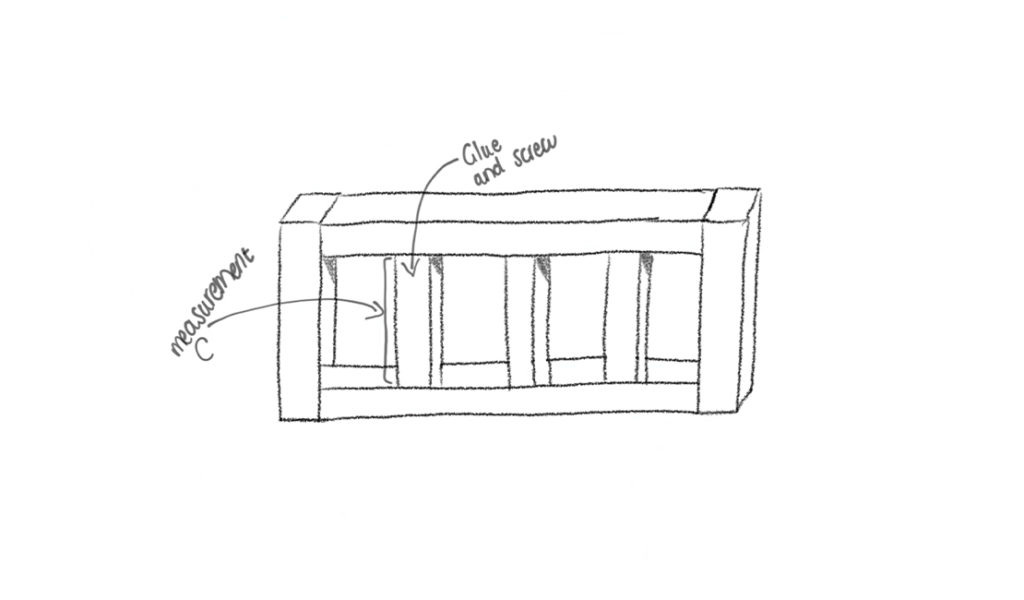
4. Next, measure the distance between the upper and lower “rungs” in the frame. This will be measurement C.
5. Cut three 44x44mm boards to the same length as measurement C.
6. Glue and screw these three boards vertically between the two rungs of the frame (evenly distributed).
7. By now, your frame should look like this:
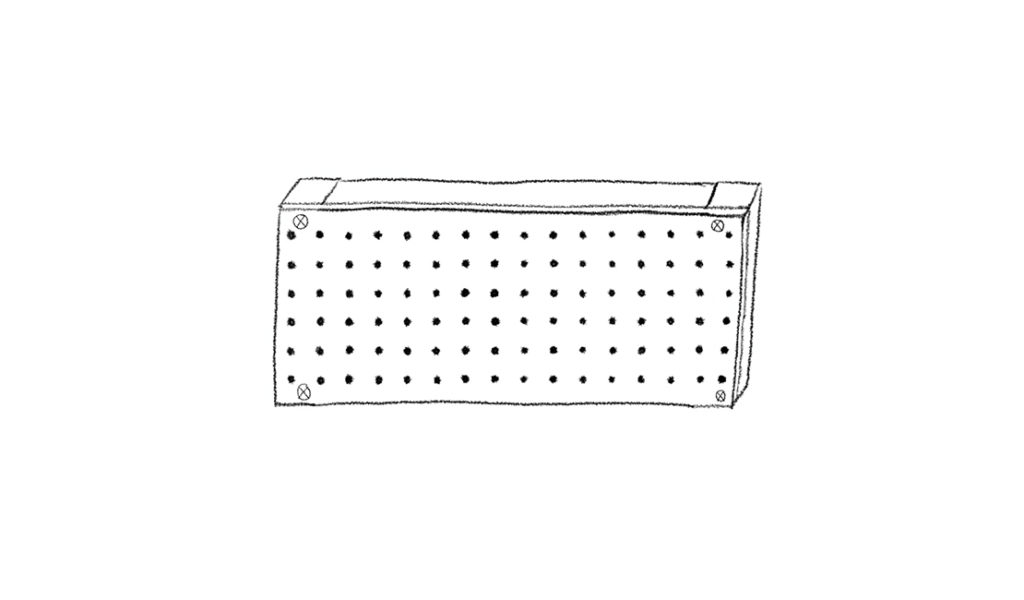
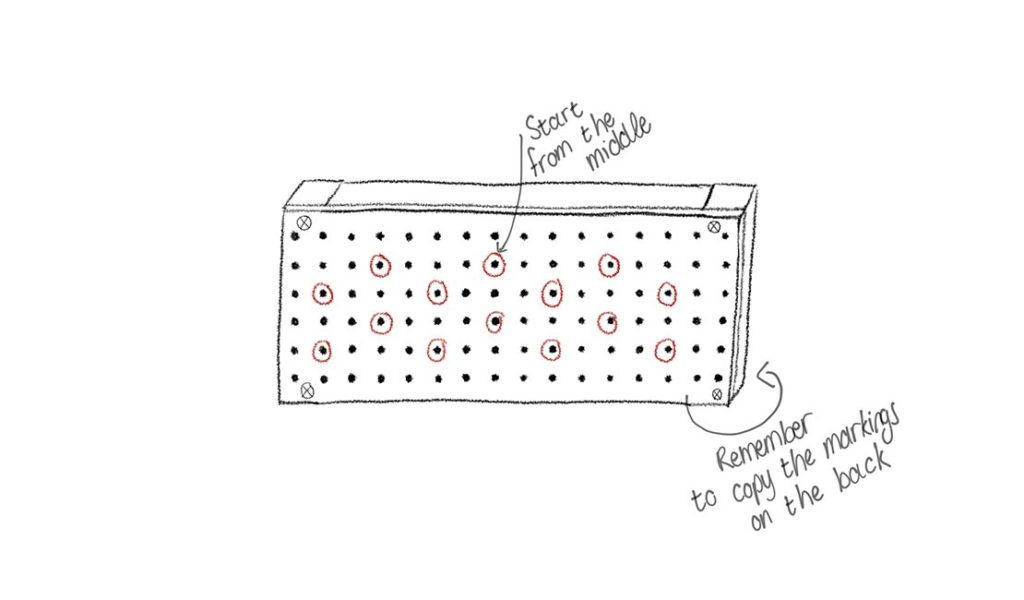
8. Next, mark a rectangle on the pegboard using measurements A and B.
9. Saw along the lines to cut out a pegboard that’ll fit perfectly onto your frame.
10. Then, secure the pegboard onto the frame with wood screws in every corner.
11. Lastly, sand off all the edges to prevent any splinters damaging fabric in the future.
2. Next, place the frame on top of the high-density foam and mark the outline of the frame on the foam.
3. Cut out along the markings on the foam. Don’t worry if the edges look a little jagged. You won’t be able to see these flaws once the fabric and batting are added to the mix. Now you’ll have a piece of foam that matches exactly with the frame size.
4. Next, secure the foam rectangle onto the front with the spray-on glue.
5. Then, secure the batting on top of the foam, also with spray-on glue.
6. Lastly, spray some glue on the front of the batting, and lay the fabric, right side facing up, on top of the batting.
Your layers should look like this:

Now that you’ve prepared the frame, it’s time to start the tufting process. Turn over your frame with the fabric side facing away from you, and the inside of your frame (pegboard visible) facing towards you. Now you can see the exact markings where you want your tufts to be.
With the needle and upholstery thread, start your tufts in the middle. This ensures that the fabric stretches evenly when you make your tufts.
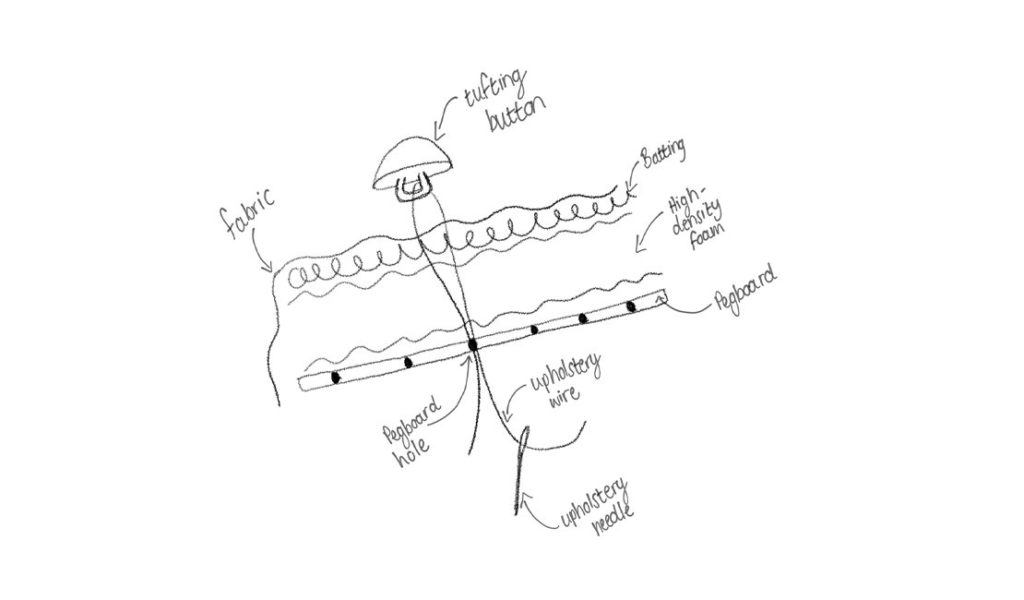
Pro tip: To make things easier, have someone help you. Ask a friend to push the button towards the pegboard. This will make it easier to knot the thread.
Once you’ve completed all tufts, it’s time to finish things off and install your furniture piece.
4. Lastly, install the heavy-duty picture mounts to hang your new upholstered headboard above your bed. For an even more secure installation, use more than two picture mounts.
We hope we could motivate and inspire you to take this project head-on. With clear instruction and the right set of tools, you’ll have the perfect headboard in no time! If you’re not the DIY type we have a range of high-quality headboards on sale.
Happy crafting!
Sleeper Couch or Sofa Bed? A Guide to What Works for Your Space
Beds For Sale: What to Know Before You Buy
Best Beds: The 7 Best Bed Brands in South Africa
Comparing Queen Beds & Double Beds: Pros, Cons & Tips
5 Affordable Kids Beds That Don’t Compromise on Quality
How to Style a Three-Quarter Bed for Maximum Style & Comfort
Bedroom Furniture Guide for Newlyweds: From “I Do” to Move-In
Why Single Beds Are Making a Comeback: Secrets to a Functional Home
From Dorm Room to First Apartment: Why a Double Mattress Is Ideal
Double Beds: Memory Foam vs. Spring Mattresses Pros and Cons